


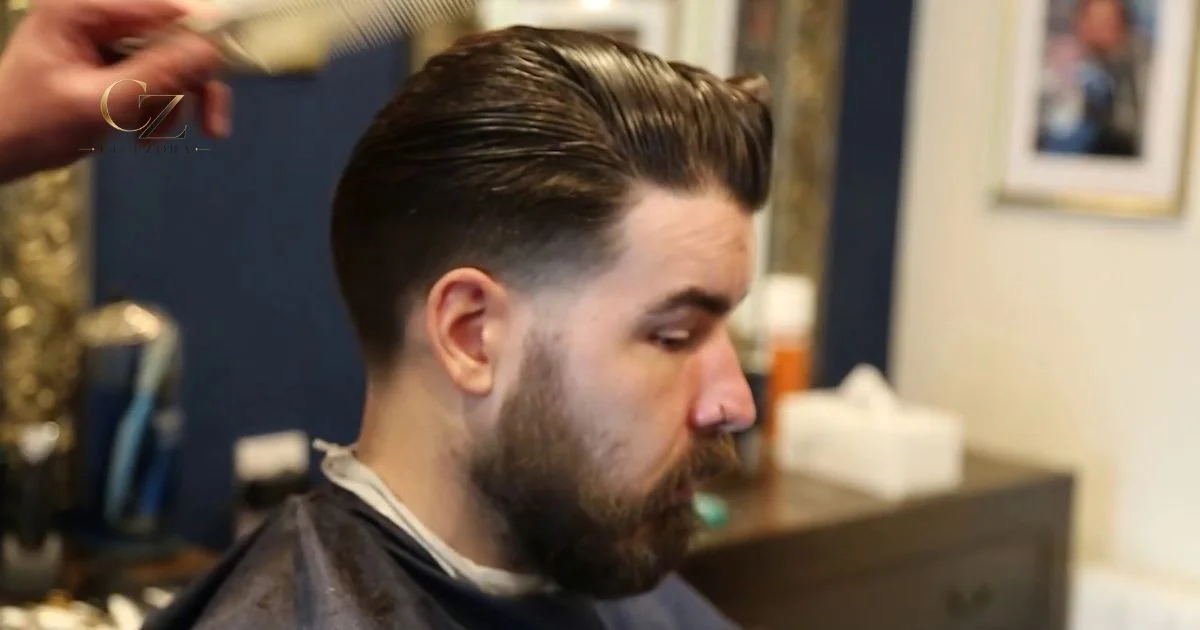
The long hair slick back taper fade pairs substantial length on top — typically four to six inches — with sides that gradually shorten toward the ears and neckline without ever reaching bare skin. The top gets combed or blown straight back for a smooth, polished finish, while the taper provides just enough cleanup to keep the shape intentional. It works across straight, wavy, and curly hair, suits most face shapes, and moves comfortably between a boardroom and a weekend without needing to change a thing.
What sets this cut apart from a standard slick back with an undercut or a skin fade is restraint. The taper stays low and soft, leaving visible hair at even its shortest point. That subtlety is also what makes it forgiving: the fade line grows out slowly, which means longer gaps between barber visits without losing the shape.
What Makes It Different from a Slick Back Fade
The terminology trips up a lot of people, and using the wrong word at the barber can lead to a cut you didn’t picture. A taper reduces hair length gradually from top to bottom but always keeps some visible hair, even at the lowest point near the ears and neckline — usually finished with a number one or two clipper guard. A fade, by contrast, blends all the way down to the skin somewhere in the gradient, producing a sharper, more defined edge.
A “long hair slick back taper fade” technically combines both concepts: the hair tapers down the sides while fading slightly at the very bottom for a cleaner perimeter, but without the dramatic skin exposure of a full skin fade. That middle ground is exactly why it appeals to people who want clean sides without a high-contrast look. A high or mid skin fade needs a touch-up every two to three weeks to stay crisp. A low taper fade, because the blend sits close to the natural hairline and never fully exposes scalp, stays presentable for four to five weeks.
How Much Length You Actually Need on Top
Most barbers consider four to six inches the sweet spot for a slick back with a taper fade. At four inches, straight hair can be combed back with pomade and hold its shape without much resistance. At five to six inches, there’s enough length to create visible volume at the crown and a natural sweep toward the back, which gives the style its characteristic fullness.
Wavy and curly hair typically need an extra inch or two beyond what straight hair requires, because the curl pattern shortens the visible length. Someone with curly hair who wants a slick back that reaches past the crown should aim for at least five to six inches of stretched length.
Going beyond six inches is possible and creates a more dramatic flow, but the longer the top, the more daily styling effort the cut demands — and the heavier the product load needed to keep everything swept back.
How to Ask Your Barber for This Cut
Miscommunication at the chair is the most common reason people end up with the wrong fade height or too little length on top. A few specific details prevent most of those problems.
Say “low taper fade” rather than just “fade.” Specify that you don’t want bare skin at the bottom — mention a number two guard finish if you’re comfortable with clipper numbers, or simply tell your barber you want some length even at the shortest point. For the top, give an actual measurement: “keep five inches on top” is far more useful than “leave it long.” If your barber works in finger-widths rather than inches, point to a spot on your hand.
Bring at least one reference photo, ideally two from different angles. A single front-facing image can misrepresent the fade height or the taper around the ears. Mention your hair texture and any cowlicks, since these change how the top sits once it’s styled back.
Styling at Home: The Daily Routine
The cut only looks intentional with a morning routine, but the routine doesn’t need to be complicated. Start with damp hair — not dripping wet, not fully dry. Product distributes more evenly on slightly damp strands, and the hair holds its direction better when shaped before it dries completely.
For a sleek, polished finish, warm a small amount of pomade or strong-hold styling cream between your palms and work it through from the roots first, then smooth it backward toward the crown. Root-first application matters: product only on the ends leaves the base flat, and by midday the front falls forward. Follow with a blow dryer on medium heat, using a vent brush or your fingers to guide the hair straight back. A final blast of cool air sets the shape.
For a more textured, relaxed finish — where individual strands are visible and the look reads as effortless rather than formal — swap the pomade for a matte clay or lighter cream. Blow dry with your fingers instead of a brush, lifting at the roots for volume rather than pressing flat. Skip the cool-air finishing step to keep a bit of natural movement.
Wavy hair generally benefits from air-drying with a sea salt spray, then finger-shaping back. Curly hair does best with a leave-in conditioner or curl cream worked through while soaking wet, followed by a diffuser on low heat or air drying — then gently smoothing back with fingers once dry.
Choosing the Right Product
The product does more work than the cut on any given day, and matching it to your hair type saves a lot of frustration.
Straight hair tends to lack natural grip, so a medium- to strong-hold pomade — water-based for everyday use, oil-based when the style has to last through an evening — provides the control needed to keep hair swept back. A texturizing powder at the roots before applying pomade adds lift for people whose straight hair lies flat against the scalp.
Wavy hair already has texture working in its favor. A lightweight styling cream or a sea salt spray enhances the wave pattern while keeping the hair directed backward. Heavy pomades weigh down waves and kill the movement that makes the style look natural.
Curly hair needs moisture above all. A curl cream paired with a leave-in conditioner keeps curls defined without frizz. Gel can work for a more sculpted slick back on curly hair, but it risks a crunchy finish if applied too heavily.
One consistent rule applies across all hair types: less product is almost always better to start. A pea-sized amount for short-to-medium density hair, a dime-sized amount for thicker hair. Build up in thin layers rather than loading product in all at once.
Which Face Shapes It Works Best With
The low taper fade is one of the more forgiving cuts because it barely alters the proportions of the sides — the styling on top does most of the shaping work.
Oval faces can wear virtually any version without adjustment. Round faces benefit from height on top: blow-drying the front upward before sweeping it back creates vertical volume that lengthens the face. Square faces tend to look best with a bit of texture and movement in the slick back rather than a rigid, glass-flat finish, which can over-emphasize angular features. Longer or rectangular faces should avoid adding too much height and instead let the hair sit flatter against the head, possibly with a slight side part rather than a straight-back sweep.
Maintenance and Touch-Up Schedule
The low placement of this fade is its biggest practical advantage. Because the blend sits near the natural hairline rather than halfway up the head, regrowth is less obvious and the cut holds its shape longer than a mid or high fade.
Most people can stretch the fade refresh to every four to five weeks. The top, if you’re growing it out, may only need a light trim for split ends and shaping every six to eight weeks. Between appointments, a home trimmer can clean up stray hairs at the neckline and around the ears without touching the fade blend itself — but leave the gradient to a barber, since an uneven fade line is difficult to correct.
Average hair grows roughly half an inch per month. Faster growers may need the fade cleaned up closer to three weeks, while slower growers can push to five without the cut looking neglected. Book the first follow-up at four weeks and adjust from there based on how the taper held.
Common Mistakes That Undermine the Style
Three errors come up more than any others. The first is using too much product, which turns a slick back greasy and heavy rather than polished — halve the amount you think you need and build up. The second is applying product to fully dry hair, which creates clumps and uneven hold; always start damp. The third is being vague at the barber: saying “just clean it up” when you actually want a specific fade height and top length leads to inconsistent results visit after visit.
Skipping the blow-dry step is another frequent shortcut that costs more than it saves. Air-drying a slick back on straight hair almost always results in a flat, lifeless finish. The blow dryer’s heat and directed airflow lock in both the backward direction and the root volume that keep the style looking intentional through the afternoon.
Sources: wikiHow | Taper Trends | Forte Series | 007 Barbershop
